The Ultimate Guide to Making Dutch Oven Peach Cobbler: Tips, Variations & Serving Ideas

introduction

What is Dutch Oven Peach Cobbler?

Dutch Oven Peach Cobbler is the epitome of comfort food, blending the simplicity of a rustic dessert with the irresistible sweetness of ripe peaches. Imagine a golden-brown topping over juicy, tender peaches, all baked in the classic Dutch oven—a versatile cooking vessel that imparts a unique flavor and texture to your dishes. Whether you’re camping in the wild or baking in the comfort of your kitchen, this dessert is sure to satisfy your sweet tooth and warm your soul.

A Dutch oven peach cobbler is not just a treat for your taste buds; it’s an experience. The combination of sweet, caramelized peaches with a biscuit-like topping creates a dessert that’s crispy on top and delightfully soft underneath. The best part? It’s incredibly easy to prepare, and you don’t need any fancy equipment—just a Dutch oven and some basic ingredients you probably already have in your pantry.

When baked to perfection, a Dutch oven peach cobbler can evoke memories of cozy family gatherings, outdoor adventures, or even spontaneous kitchen experiments. The warm, sweet fragrance that fills the air is almost as enticing as the taste itself, making it the perfect dessert to serve after a long day of outdoor fun or as a sweet ending to a hearty meal. And the beauty of Dutch oven cooking is that it doesn’t require constant attention; once the cobbler is in the oven, you can relax and enjoy the moment.


The Charm of Dutch Oven Desserts

Dutch ovens have been a favorite tool for both home chefs and outdoor enthusiasts for centuries. Their thick, heavy walls allow for even heat distribution, making them ideal for slow-cooking stews, braises, and yes, desserts. But what makes them especially perfect for peach cobbler is their ability to trap heat and moisture, creating the perfect environment for the fruit to soften and caramelize while the topping turns golden brown and slightly crisp.

Whether you’re using your Dutch oven over a campfire or in a traditional kitchen oven, it adds an authentic touch that makes the cobbler even more delightful. This old-fashioned cooking method turns an ordinary dessert into something extraordinary. You’ll be able to savor every bite, knowing that the slow-cooked flavor is thanks to the trusty Dutch oven.

Why Peach Cobbler is a Perfect Dessert

Peach cobbler has earned its reputation as a classic dessert. It’s not just about the peaches, though—they play an important part. The natural sweetness and juiciness of fresh peaches (or canned ones in a pinch) pair beautifully with the golden topping. It’s the balance between the fruity filling and the slightly crunchy crust that keeps people coming back for more. Peach cobbler is simple, satisfying, and perfect for any occasion.

This beloved dessert can be made with ingredients that are readily available, making it a go-to choice for both experienced bakers and beginners. And when prepared in a Dutch oven, it adds an element of nostalgia and comfort, whether you’re serving it for a family dinner, a picnic, or after a day of outdoor activities.

Moreover, peach cobbler’s flexibility is another reason it’s so adored. You can serve it warm with a scoop of vanilla ice cream for a classic touch, or top it with whipped cream for a lighter option. It’s a dessert that fits any season and any celebration, making it a perfect addition to your dessert rotation.

                     More in Dutch Oven 
                     Dutch Oven Chili Recipe click here
                     Dutch Oven Campfire Potatoes click here
                      Dutch Oven Chicken Stew click here
                     Dutch Oven Breakfast Casserole click here

Essential Ingredients for Dutch Oven Peach Cobbler

To create a delicious Dutch oven peach cobbler, you need the right ingredients to ensure the perfect combination of flavors and textures. The key is to balance the natural sweetness of the peaches with a light, fluffy biscuit topping. Here’s a breakdown of the essential components.

The Best Peaches for Cobbler

When it comes to peach cobbler, fresh and canned peaches are both excellent options, though each has its own merits.

  • Fresh Peaches: Fresh peaches, when in season, offer a more vibrant, natural flavor. You can select slightly under-ripe peaches for the best results, as they will hold up better when baked. However, fresh peaches require a little more preparation—peeling, slicing, and removing the pits can be time-consuming.
  • Canned Peaches: If fresh peaches aren’t available, canned peaches are an ideal alternative. Opt for peaches packed in syrup or water, avoiding those with added artificial flavors. You won’t need to peel or pit them, making the process faster and simpler. However, canned peaches may be a bit more watery, so you might need to drain them or reduce the liquid to prevent sogginess in your cobbler.

How to Prep Peaches for Baking

If you’re using fresh peaches, start by peeling them—this can be done easily by blanching the peaches in boiling water for about a minute, then transferring them to ice water to loosen the skins. Once peeled, slice the peaches into uniform pieces. For canned peaches, simply drain them and slice them into smaller chunks if necessary.

The Basics of Cobbler Topping

A key component of the Dutch oven peach cobbler is the biscuit-like topping. To make the topping, you’ll need the basics: flour, sugar, baking powder, salt, butter, and milk. The ratio of dry to wet ingredients creates that signature light, flaky texture.

  • Flour: The foundation of the topping. Use all-purpose flour for the best consistency.
  • Sugar: Adds sweetness and a slight crunch to the topping.
  • Baking Powder: The leavening agent that makes the biscuit topping rise.
  • Salt: Balances the sweetness and enhances flavor.
  • Butter: Provides richness and helps create a tender topping.
  • Milk: Brings everything together into a smooth dough.

Now that we’ve covered the basic ingredients, let’s turn to the essential tools you’ll need to bake the perfect cobbler.


Tools and Equipment Required

Having the right tools can make your baking experience smoother and more enjoyable. The proper Dutch oven, along with other kitchen essentials, is all you need to make a successful Dutch oven peach cobbler.

Choosing the Right Dutch Oven Size

For a Dutch oven peach cobbler, the size of the Dutch oven matters. A 6-quart Dutch oven is generally considered the ideal size for this recipe, offering enough space for the peaches and the topping while ensuring an even bake. If you’re baking for a smaller crowd, you can opt for a 4-quart Dutch oven. However, if you’re preparing for a larger group, you may want to go up to 8 quarts.

Make sure that your Dutch oven has a tight-fitting lid to trap the heat, ensuring your cobbler cooks evenly.

Tools for Easy Baking

Aside from the Dutch oven, there are a few tools that will make the baking process more efficient:

  • Oven Mitts: These are essential for handling the hot Dutch oven. Be sure to use thick, heat-resistant mitts to protect your hands when transferring the pot.
  • Stirring Spoons: A wooden or silicone spoon is ideal for mixing the cobbler topping ingredients. These utensils won’t scratch your Dutch oven and ensure you can stir without worrying about damaging your pot.
  • Lid Lifter: If you’re baking outdoors, a lid lifter is particularly helpful when managing the hot lid of a Dutch oven. This tool allows you to lift the lid safely and without risk of burns.

How to Make Dutch Oven Peach Cobbler

Dutch oven peach cobbler is the perfect balance of sweet, juicy fruit and a golden, biscuit-like topping. Whether you’re preparing it for a cozy family dinner or a camping adventure, making this dessert from scratch is easier than you might think. Below, we’ll walk you through the entire process from preparing your peaches to baking and checking for doneness.


Preparing the Peaches

The heart of any great peach cobbler is the peaches themselves. Whether you’re using fresh or canned peaches, the preparation is key to ensuring your cobbler has the perfect texture and flavor.

Fresh or Canned Peaches?

Both fresh and canned peaches can be used for your Dutch oven cobbler, but each comes with its own set of benefits and considerations:

  • Fresh Peaches: Fresh peaches give your cobbler a vibrant flavor and texture that canned peaches can’t quite match. They provide a natural sweetness and juiciness that’s perfect for cobbler. However, fresh peaches require more prep work—peeling, pitting, and slicing them can take time. The benefit is the rich, fresh taste that will shine through in your cobbler.
  • Canned Peaches: Canned peaches are a convenient, ready-to-use option. They save time and typically have a longer shelf life. However, they often come packed in syrup, which can add extra sweetness (sometimes too much) and moisture. If you’re using canned peaches, be sure to drain them thoroughly to avoid excess liquid in your cobbler.

How to Slice and Sweeten the Peaches

For fresh peaches, follow these steps:

  1. Peel the peaches: Blanch the peaches by placing them in boiling water for 30 seconds and then quickly transferring them to ice water. This will make the skin peel off easily.
  2. Pit the peaches: Cut them in half and remove the pit. If the peaches are firm, you may need to cut around the pit and twist to separate the halves.
  3. Slice the peaches: Cut the peach halves into uniform slices or chunks—roughly 1/2-inch thick.
  4. Sweeten the peaches: Depending on the sweetness of your peaches, sprinkle 1-2 tablespoons of sugar (or more if desired) over the sliced peaches. If you like a little extra flavor, add a pinch of cinnamon, nutmeg, or vanilla extract to enhance the peach flavor.

For canned peaches, simply drain them well and cut them into bite-sized pieces if necessary. You may still want to sprinkle a little sugar or cinnamon to boost the flavor.


Making the Cobbler Topping

The topping is what gives the cobbler its signature texture: a golden, crispy outer layer and a soft, biscuit-like interior. Achieving the perfect topping consistency requires the right ingredients and a bit of care.

The Secret to a Fluffy and Golden Biscuit Topping

The perfect cobbler topping should be light, fluffy, and slightly sweet. Here’s how to achieve that texture:

  1. Combine dry ingredients: In a large bowl, whisk together 1 1/2 cups of all-purpose flour, 1/2 cup sugar, 2 teaspoons of baking powder, and a pinch of salt. These are the foundation of your topping.
  2. Cut in the butter: Add 1/2 cup (1 stick) of cold, cubed butter to the dry ingredients. Using a pastry cutter or your hands, cut the butter into the flour mixture until it resembles coarse crumbs. This will give the topping a tender, flaky texture once baked.
  3. Add liquid: Pour in 3/4 cup of milk (or non-dairy milk for a vegan version) and stir until just combined. Be careful not to overmix! The dough should be thick and sticky, not smooth and runny.

Layering Your Cobbler

Now it’s time to assemble your cobbler! Start by placing the prepared peaches in the bottom of your Dutch oven. Evenly distribute them across the bottom, making sure they’re not too crowded. Then, spoon the biscuit topping over the peaches in large dollops. Don’t worry about spreading the topping—leaving it in lumps allows the dough to puff up and create that perfect, uneven golden top.


Baking and Cooking the Cobbler

Now that your peach cobbler is assembled, it’s time to bake. Whether you’re using a traditional oven or cooking outdoors with a campfire, the Dutch oven does the heavy lifting, distributing heat evenly for a perfect bake.

Preheating and Cooking in the Dutch Oven

Preheat your oven to 350°F (175°C). If you’re cooking outdoors, prepare the Dutch oven by placing it over medium heat and positioning hot coals on the lid. If you’re using an oven, place the Dutch oven in the center of the oven to allow the heat to circulate evenly around the cobbler.

Bake the cobbler for 35 to 40 minutes, or until the topping is golden brown and the fruit is bubbling. If you’re baking outdoors, you may need to adjust the heat and check on the cobbler more frequently.

How to Check for Doneness

You’ll know your cobbler is done when the topping is golden and slightly crisp, and the peaches are soft and bubbling. Use a fork or toothpick to test the topping—if it comes out clean, it’s ready to serve. If you see raw dough sticking to the fork, give it a few more minutes in the oven. For a campfire, check if the edges are crisp and browned.

Once fully cooked, allow the cobbler to rest for 10-15 minutes before serving. This allows the juices to settle and the topping to firm up a bit.

Common Problems and How to Fix Them

Even the most experienced bakers face a few hiccups when making peach cobbler. Whether it’s a soggy bottom or a too-dense topping, understanding the causes behind these issues can help you make adjustments and perfect your Dutch oven peach cobbler. Let’s dive into the most common problems and how to fix them!


Why Is My Peach Cobbler Gummy at the Bottom?

A gummy bottom is one of the most common problems with cobblers, but don’t worry—there are simple ways to prevent and fix it. Here’s what could be causing this issue:

The Causes of a Gummy Bottom

  1. Excess Moisture from Peaches: The most common reason for a gummy bottom is too much liquid from the peaches. Peaches, especially fresh ones, release a lot of juice as they bake. If you’re using canned peaches, the syrup they come in can add even more moisture to the cobbler.
  2. Underbaking: If your cobbler hasn’t baked long enough, the excess moisture in the fruit will not have had time to evaporate. The bottom layer will stay soggy and undercooked.
  3. Not Thickening the Fruit: If the peaches aren’t properly thickened, they can create too much liquid during the baking process. You can add a thickener such as cornstarch or tapioca to absorb some of the excess moisture.

How to Fix It

To avoid a gummy bottom, here are some tips:

  • Drain Canned Peaches: If using canned peaches, make sure to drain them thoroughly. You can even cook the fruit down in a skillet for a few minutes to reduce excess liquid before adding them to your Dutch oven.
  • Use a Thickening Agent: Mix 1-2 tablespoons of cornstarch or tapioca flour with the sugar and spices for the peach filling. This will help absorb the extra moisture and give the filling a more appealing, thicker consistency.
  • Increase Baking Time: Make sure the cobbler is baking long enough to allow the moisture to evaporate. If the top is golden but the bottom is still gooey, give it a few extra minutes in the oven or campfire.

How to Prevent a Soggy or Overly Wet Topping

A soggy or overly wet topping is another common issue that can occur when making Dutch oven peach cobbler. Achieving a crispy, golden topping requires the right balance of ingredients and baking technique. Here’s what might be going wrong:

Tips for Achieving the Perfect Topping

  1. Don’t Overmix the Dough: Overmixing your biscuit topping dough will make it dense and heavy, which can prevent it from rising properly. Stir just until the ingredients are combined to keep it light and airy. The more you handle the dough, the less fluffy it will be.
  2. Proper Thickness of the Topping: If the topping is too thin, it can soak up the peach juices and become soggy. Be sure to spoon it generously over the fruit. Don’t worry about spreading it evenly—lumps and mounds will bake into a nice, golden crust.
  3. Bake at the Right Temperature: Baking your cobbler at too low a temperature can result in a soggy topping. Make sure your oven or campfire has reached the right temperature (350°F/175°C) before placing the Dutch oven inside. If the heat is too low, the topping won’t cook through and will remain wet.
  4. Preheat the Dutch Oven: Whether you’re baking indoors or outdoors, preheating the Dutch oven can make a big difference. By allowing the pot to heat up before placing the cobbler inside, you ensure that the topping cooks evenly and crisps up nicely.
  5. Avoid Underbaking: Undercooking the cobbler will leave the topping soggy and raw. The cobbler needs enough time in the oven to fully bake the topping. A golden, slightly crispy crust is your cue that it’s done.

How to Fix It

If you’re already dealing with a soggy topping, here’s how you can fix it:

  • Increase Baking Time: If your topping isn’t fully baked, add more time to your bake. Check every 5 minutes until the topping is golden and firm.
  • Broil to Crisp the Top: If your cobbler is cooked but the topping is still soft, switch your oven to broil for a minute or two at the end. Keep a close eye on it to avoid burning the topping while it crisps up.

Classic Dutch Oven Peach Cobbler Recipe

There’s something special about a classic Dutch oven peach cobbler. It’s a timeless dessert that’s both simple to make and incredibly satisfying. If you’re looking for a foolproof recipe that will never let you down, this one’s for you.

The Traditional Recipe You Can’t Go Wrong With

To create a traditional Dutch oven peach cobbler, follow these easy steps:

  1. Prepare the Peaches: Use fresh or canned peaches. If using fresh peaches, peel, pit, and slice them into chunks. If using canned, drain the liquid and cut them into smaller pieces.
  2. Make the Topping: Combine all-purpose flour, sugar, baking powder, and salt in a mixing bowl. Cut in butter until the mixture resembles coarse crumbs. Add milk until you form a dough.
  3. Layer the Cobbler: Place the prepared peaches in the bottom of the Dutch oven. Spoon the topping over the peaches, ensuring it covers the entire surface.
  4. Bake: Preheat your Dutch oven, either in the oven or over a campfire, and bake for 35-40 minutes or until the topping is golden and the peaches are bubbling.

With this recipe, you’ll enjoy a classic peach cobbler every time.


Unique Twists on Dutch Oven Peach Cobbler

While the traditional Dutch oven peach cobbler is hard to beat, there are several fun and unique ways to give your cobbler a flavorful twist. Here are some creative variations that can take your cobbler to the next level.

Adding Cinnamon and Nutmeg

One of the easiest ways to elevate your Dutch oven peach cobbler is by adding cinnamon and nutmeg to the peach filling or the topping. These warm spices enhance the natural sweetness of the peaches, adding depth and complexity to the flavor. You can sprinkle cinnamon over the peaches before adding the topping or mix it directly into the topping dough.

The combination of cinnamon and nutmeg gives your cobbler that comforting, homey flavor that makes it perfect for cool evenings or holiday gatherings. You don’t need much—just a pinch or two of each spice.

Peach and Berry Cobbler

If you want to add more variety to your cobbler, try mixing in some berries like blackberries, raspberries, or blueberries with the peaches. The acidity from the berries balances the sweetness of the peaches and adds an extra burst of flavor. This version works beautifully with fresh summer fruits, but frozen berries can work just as well.

Simply mix the berries into the peaches before layering with the cobbler topping. The result is a fruity, colorful twist on the classic peach cobbler that’s sure to impress!


Vegan and Gluten-Free Peach Cobbler

Whether you’re following a vegan or gluten-free diet, or simply want to experiment with different ingredients, you can easily adjust your Dutch oven peach cobbler recipe to meet these dietary needs.

How to Make a Vegan Version

To make your peach cobbler vegan, you’ll need to substitute the dairy and eggs with plant-based alternatives:

  • Butter: Use vegan butter or coconut oil in place of regular butter. These options will provide the richness you need for the topping.
  • Milk: Substitute with almond milk, coconut milk, or oat milk.
  • Eggs: Most traditional peach cobbler recipes don’t call for eggs in the topping, but if your recipe does, you can replace them with a flax egg or chia egg (1 tablespoon ground flax or chia mixed with 3 tablespoons water).

The result? A delicious plant-based peach cobbler that everyone can enjoy, without compromising on taste!

Gluten-Free Peach Cobbler Recipe

Making a gluten-free Dutch oven peach cobbler is simple by swapping all-purpose flour with a gluten-free flour blend or almond flour. Here’s how to do it:

  • Flour Substitute: Use a gluten-free baking mix, which typically includes a blend of rice flour, tapioca flour, and other gluten-free starches. Alternatively, almond flour can provide a slightly nutty flavor while keeping the cobbler light and tender.
  • Baking Powder: Make sure your baking powder is gluten-free, as some brands contain gluten.

By making these substitutions, you’ll have a gluten-free peach cobbler that’s just as satisfying as the traditional version. It’s the perfect solution for anyone who can’t enjoy gluten but still craves that delicious, warm cobbler.

How to Serve Dutch Oven Peach Cobbler

Now that your Dutch oven peach cobbler is baked to perfection, it’s time to serve it up! This dessert is versatile, and there are plenty of ways to enhance its presentation and flavor. From pairing it with ice cream to serving it in smaller portions, let’s explore some ideas for making your cobbler even more special.

Pairing with Ice Cream or Whipped Cream

Nothing beats the combination of warm peach cobbler and a scoop of vanilla ice cream. The cold, creamy ice cream contrasts beautifully with the hot, juicy peaches, and the rich, buttery topping adds a satisfying crunch. The simplicity of vanilla ice cream complements the flavors of the cobbler without overpowering them. If you’re feeling adventurous, you can try other flavors like cinnamon, caramel, or coconut milk ice cream for a vegan twist.

For those who prefer a lighter option, you can top your cobbler with freshly whipped cream. A dollop of whipped cream adds a fluffy, airy texture that contrasts with the cobbler’s density. It’s perfect for people who want a less sweet but still indulgent topping.

For a more decadent experience, drizzle a little caramel sauce or chocolate syrup over the top. These extra touches can elevate your cobbler to new heights, making it feel like a restaurant-quality dessert at home.

Serving in Individual Portions

For a more elegant or practical way to serve Dutch oven peach cobbler, consider offering individual portions. Instead of serving the cobbler family-style, spoon out the cobbler into smaller dishes like ramekins or individual bowls. This is perfect for parties, as it allows each guest to have their own serving without the need for extra dishes. Plus, it’s easier to control portion sizes.

If you’re hosting a casual gathering, individual servings can be a fun way to make everyone feel special. Add a small scoop of ice cream on top, and garnish with a sprig of mint or a sprinkle of cinnamon for a festive touch.

For an outdoor event like a picnic or a barbecue, small cast-iron skillets or baking dishes can be used to serve individual portions of peach cobbler. The mini Dutch ovens or skillets not only look charming but also make it easier to serve and reheat if needed.

How to Store Leftover Peach Cobbler

If you’ve made a large batch of Dutch oven peach cobbler and find yourself with some leftovers (which, let’s be honest, is often the case), don’t worry—you can keep it fresh and enjoy it later. Storing peach cobbler properly ensures that it remains delicious when you’re ready for seconds (or thirds).

Proper Storage Techniques

To store your leftover peach cobbler, let it cool down to room temperature before refrigerating it. This helps prevent condensation from forming on the lid or inside the container, which could make your cobbler soggy. Here’s how to store it properly:

  • Refrigerate: Place the cobbler in an airtight container or cover the Dutch oven with a tight-fitting lid if it’s still in the pot. You can also use a large plastic wrap to cover the entire Dutch oven. Store it in the refrigerator for up to 3-4 days.
  • Freezing: If you have a lot of leftovers or want to enjoy cobbler weeks later, freezing it is an option. Let the cobbler cool completely, then cut it into portions. Wrap individual slices in plastic wrap and foil, and place them in a freezer-safe bag or container. Frozen peach cobbler can be kept for up to 3 months. When you’re ready to eat it, simply thaw in the refrigerator overnight before reheating.

While storing peach cobbler, keep in mind that the topping might lose some of its crispy texture, but the flavors will still remain delicious.


Reheating Dutch Oven Peach Cobbler

Reheating your peach cobbler properly ensures that you can enjoy it just as much the second time around. You’ll want to restore some of that golden, crisp topping while keeping the peaches soft and juicy. Here’s the best way to reheat peach cobbler without losing its texture:

The Best Way to Reheat for Freshness

  • In the Oven: The best method for reheating Dutch oven peach cobbler is in the oven. Preheat your oven to 350°F (175°C). If your cobbler is in a Dutch oven, simply cover it with the lid (or with aluminum foil) and bake for 20-25 minutes. This will help the topping regain some of its crispiness while warming up the peaches. If it’s a single serving, place it in an oven-safe dish and cover it with foil.
  • In the Microwave: For a quicker option, you can microwave the cobbler, though this method may make the topping a bit softer. Place a slice of cobbler on a microwave-safe plate, cover it with a damp paper towel to prevent it from drying out, and heat on high for 30-60 seconds, depending on the size of the portion.
  • On the Stove: If you’re using individual portions, you can reheat the cobbler in a skillet over low heat. Place a lid on the skillet to trap the heat, and heat for about 10 minutes. This helps keep the topping somewhat crispy.

While reheating, you can also add a scoop of ice cream or a dollop of whipped cream for extra indulgence!

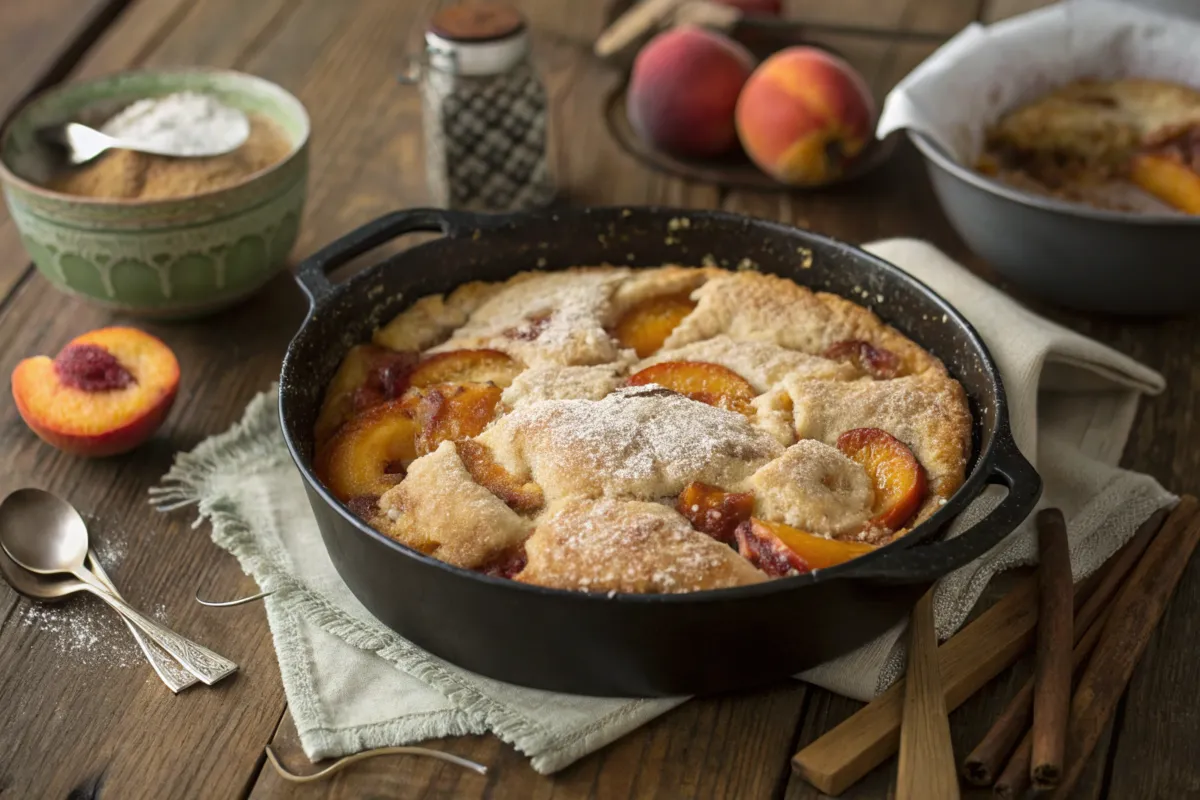
A close-up of a Dutch oven peach cobbler featuring golden-brown crust with bubbling peaches in a rich syrup

Frequently Asked Questions about Dutch Oven Peach Cobbler

Making Dutch oven peach cobbler might seem straightforward, but like any recipe, there are questions that pop up along the way. Whether you’re a beginner or a seasoned baker, understanding the details can ensure your cobbler comes out just right every time. Below are some of the most commonly asked questions, along with answers to help you troubleshoot and perfect your peach cobbler.

What’s the Difference Between a Peach Cobbler and a Crumble?

While both peach cobbler and a crumble share similar flavors, they differ in texture and topping.

  • Peach Cobbler: Typically made with a biscuit-like topping that covers the fruit filling. The topping is soft but can become slightly crispy around the edges, giving the cobbler its distinctive texture.
  • Peach Crumble: A crumble topping is usually made from butter, flour, sugar, and oats, creating a more crumbly, crunchy texture. Unlike the cobbler, the topping doesn’t rise or have the biscuit-like consistency, and it’s typically more crunchy than soft.

Both desserts are equally delicious, but if you prefer a softer, more biscuit-like topping, a cobbler is the way to go.

Why Is the Bottom of My Peach Cobbler Gummy?

A gummy or soggy bottom is a common issue with peach cobbler. There are a few reasons this might happen, but the most likely cause is too much moisture from the peaches. Here’s how to fix it:

  • Excess Liquid: Peaches, especially fresh ones, release a lot of juice as they bake. If you don’t drain the peaches (especially canned ones), it can lead to excess liquid that makes the bottom soggy.
  • Underbaking: If your cobbler isn’t baked long enough, the liquid won’t have time to evaporate, leaving you with a wet bottom. Make sure you bake it for the recommended time to allow the moisture to evaporate.

To prevent this, try draining your peaches or cooking them down in a skillet for a few minutes before adding them to the Dutch oven. You can also add a thickener, like cornstarch or tapioca, to help absorb the moisture.

Is It Better to Use Fresh or Canned Peaches for Cobbler?

Both fresh and canned peaches can be used for peach cobbler, but each has its pros and cons:

  • Fresh Peaches: Offer a bright, tangy flavor, but they require more prep work, including peeling and slicing. Fresh peaches are ideal when they’re in season, as they add a vibrant, natural sweetness.
  • Canned Peaches: Are incredibly convenient and save time. They’re often packed in syrup, which can add extra sweetness. However, they might be a bit mushier and can release more liquid during baking, so you’ll need to drain them properly.

The choice between fresh and canned depends on personal preference and what’s available. Fresh peaches will give your cobbler a fresher taste, while canned peaches make the process quicker.

Is Cobbler Dough the Same as Pie Crust?

No, cobbler dough is quite different from pie crust dough. Pie crust is flaky and made with butter and cold water, rolled out into a thin layer to cover the filling. In contrast, cobbler dough is thicker, often made with baking powder or soda, and has more of a biscuit-like consistency.

Cobbler dough doesn’t need to be rolled out, and it’s usually spooned over the filling in rough dollops. The result is a soft, biscuit-like topping, unlike the flaky, delicate crust of a pie. So, while they may look similar, the textures are distinct!

Can I Use Other Fruits in Dutch Oven Cobbler?

Absolutely! While peach cobbler is a classic favorite, the beauty of cobbler is its versatility. You can easily substitute peaches with other fruits like:

  • Berries: Blueberries, blackberries, raspberries, or strawberries make a delicious, tart filling.
  • Apples: A warm, spiced apple cobbler is perfect for colder months.
  • Pears: Pears add a lovely texture to cobbler and pair beautifully with cinnamon.
  • Plums or Cherries: These fruits work well for a sweet and slightly tangy cobbler.

Conclusion and Tips for the Perfect Dutch Oven Peach Cobbler!

Why You Should Try Dutch Oven Peach Cobbler

Dutch oven peach cobbler is more than just a dessert; it’s an experience. Whether you’re baking it over a campfire or in your home kitchen, this warm, comforting treat brings together the best of both worlds—the sweetness of peaches and the buttery, biscuit-like topping. It’s perfect for any occasion, from family dinners to camping trips, and it’s incredibly easy to make with just a few simple ingredients.

What makes this dessert stand out is the versatility. You can experiment with different fruits, tweak the spices, or even make it vegan or gluten-free to suit your dietary needs. Whether you stick with the classic peach cobbler or add your own twist, the Dutch oven method ensures that the cobbler comes out with a perfectly golden crust and tender, caramelized fruit every time.

The beauty of Dutch oven peach cobbler lies not just in the flavor, but in the process. The slow cooking in the oven or over a fire allows the ingredients to meld together beautifully, creating a comforting dessert that’s more than just food—it’s a memory in the making. Perfect for sharing with friends or enjoying solo after a long day, this dessert has a way of bringing people together.


Tips for Perfecting Your Peach Cobbler Every Time

Now that you’ve learned how to make Dutch oven peach cobbler, here are a few tips to ensure you get perfect results every single time you bake it:

1. Use Quality Peaches

The key to a delicious peach cobbler is choosing the best peaches. Whether you go with fresh or canned, make sure they’re ripe and flavorful. If using fresh peaches, opt for those that are slightly under-ripe, as they’ll hold their shape better during baking. If using canned peaches, be sure to drain them well to avoid excess liquid.

2. Don’t Overmix the Topping

One of the most important tips for a successful cobbler is to avoid overmixing the topping. When you combine the dry ingredients with the wet, mix just until the dough comes together. Overmixing will lead to a dense, tough topping instead of the light, fluffy biscuit texture you’re after.

3. Check for Doneness

Baking times can vary depending on your Dutch oven, so always check the cobbler for doneness. The topping should be golden brown, and the fruit should be bubbling around the edges. A good test is to gently press on the topping with a fork—if it springs back, it’s done!

4. Control the Heat

If you’re baking your peach cobbler over a campfire or grill, make sure the heat is even. Dutch ovens work best when the heat surrounds them, so ensure you’re not exposing the bottom to too much direct flame. If you’re using an oven, make sure it’s preheated to the right temperature, and consider rotating the Dutch oven halfway through baking for even cooking.

5. Let it Rest Before Serving

After removing the cobbler from the heat, let it rest for about 10-15 minutes before serving. This allows the fruit to settle and the topping to firm up a bit. It also gives you time to prepare any toppings, like whipped cream or ice cream, to serve alongside your cobbler.

 dutch oven camping recipes click here 

click here to discover more delicious and easy breakfast or dessert recipes
For more Questions of Different recipes, click here
Check out these simple and delicious lunch & dinner recipes by  clicking here

Leave a Comment